| |
sure all parts are on hand and that the toggle pins and
bolts are seized with short sections of wire and attached
to the ladder to prevent them from being lost over the
ship's side.
The next step is to rig the upper platform.
Remember to be careful in lining up the brackets when
you are engaging the bolts. Many a hand injury has
occurred from careless or unsupervised rigging
operations.
Once the upper platform is in place, the next step is
to secure the ladder to it. This is an area where the ship's
plans and design must be followed. Some ships have the
ladder stowed against the rail. To attach this type ladder,
you use a series of outriggers (arms swung out from the
ship) to lay the ladder on and seat the ladder to the upper
and lower platforms. On ships that do not have
outriggers, the J-Bar davit can be used to support the
ladder over the side to attach it to the upper platform.
Another method is to use a ladder that engages pad eyes
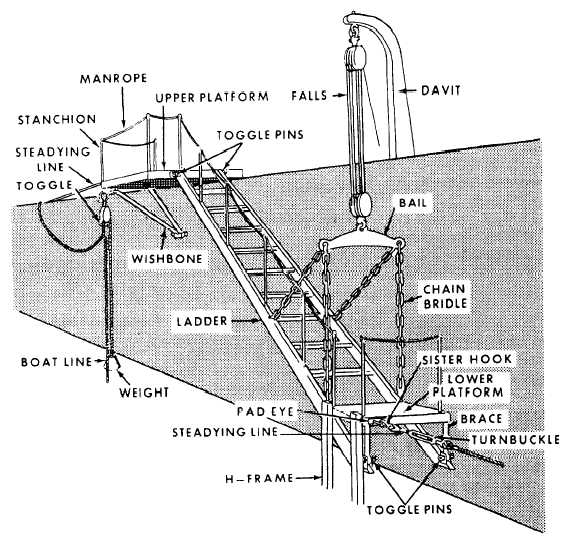
Figure 4-18.–Parts of accommodation ladder.
on the side of the ship and holds them in place by a
two-fold rigged to the superstructure.
Depending on the type and class of the ship, rigging
procedures will vary. Again, the ship's rigging plans
must be used.
Now that the ladder is attached to the upper
platform, the lower platform and the H-Frame must be
rigged. It is easier if the H-Frame is rigged to the lower
platform while it is still on deck. Once the H-Frame and
the lower platform are rigged on deck they must be
worked over the side to attach to the ladder. This can be
done by using the falls from the J-Bar davit or from
some other suitable attachment point.
The ladder is now taking shape and nearly ready to
lower. Rig the bail and bridle to the ladder and attach the
wire pendant between the bail and the J-Bar davit. On
some ships, the pendant is rigged between the bail and
a pad eye alongside the ship.
4-19
|

