| |
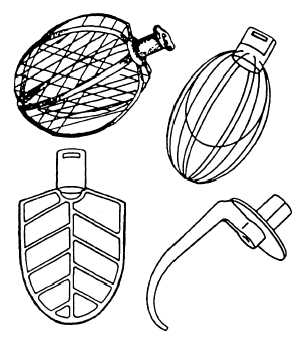
Figure 4-8.—Electric mixer attachments.
mediumweight mixing; the dough hook for mixing
bread dough; and the wire beater for medium-stiff
dough.
One part of the machine revolves through the use of
a set of transmissions and differential gears. Various
shaped paddles and mixers can be attached to this
revolving unit.
The lower part of the mixer contains two extended,
adjustable arms. A bowl, containing the foods to be
mixed, is placed on these arms and the arms are then
moved up so the paddles will revolve throughout the
mixture. The machines have either three or four speeds.
Usually they have an attachment hub that can be used
for a vegetable slicer, juicer, and meat grinder.
Operation
Before operating the machine make sure the bowl,
paddles, and beaters are thoroughly clean. If necessary,
wash them in hot soapy water and rinse with hot water
(170°F).
Place the ingredients in the bowl as specified on the
AFRS recipe card. Do not fill the bowl more than half
full. Place the bowl on a castered dolly when moving
across the deck. Insert the bowl in the mixing machine,
making sure the bowl ears are on the supporting pins and
both sides are locked in place.
Select the proper attachment
machine. The L-shaped notch in
and place it in the
the beater is to be
inserted over the pin in the shaft. On the smaller models
the shaft will be grooved. The attachment is inserted into
these grooves and slipped into the lock. Raise the bowl
to the proper height by turning the wheel or crank.
Start the motor at no load and with clutch release
shift to low speed; release the clutch each time the speed
is changed. The speed to be used is indicated on the
recipe card and on the instructions furnished by the
manufacturer.
Watch mixing times and mixing speeds carefully.
Often blended ingredients revert to separate ingredients
if mixed too long or at an improper speed. If, during the
process of mixing, some of the batter has piled up on the
sides of the bowl, stop the machine.
Using a
long-handled spoon or spatula, scrape down the sides of
the bowl. Never put spoons, spatulas, or your hands in
the bowl while the machine is in operation.
When the mixing is completed, move the control
switch to the OFF position and stop the motor. Lower
the bowl by the lever with which you raised it and
remove the beater by turning the sleeve to the left.
Remove any food left on the beater with a spatula. Then,
place the bowl on the castered dolly and move it to the
place of use.
Care and Cleaning
The electric mixer, beaters, whips, and bowls all
require care.
Beaters, paddles, and bowls should be
washed immediately after each use. Use hot soapy
water and rinse with hot water ( 170°F). Hang beaters
and paddles upside down to air dry. Clean the body of
the machine after each meal. Use a damp cloth or wash
with water as necessary for proper sanitation. Be sure
the beater shaft is free of all dirt and food particles.
The motor and mechanical parts of the mixer should
be inspected and maintained by the engineering
department once a week.
ELECTRIC MEAT-SLICING MACHINE
The meat-slicing machine (fig. 4-9) is motor
operated and is used for slicing hard or soft foods such
as roasts, cheese, bacon, luncheon meats, and ham.
The machine has a carriage on which the meat is
placed. A swiftly revolving disk knife slices the meat as
the carriage is moved across the face of the revolving
knife.
4-11
|