| |
“9,” “0,” “2,” “0,” and “1". DO NOT skip any box or
write decimal periods.
Block 6: ASCENDING REGISTER BEGINNING.
Obtain this number from the meter head’s “TOTAL
(Ascending)” register reading and enter it in the same
manner as explained above for descending.
Block 7:
METER OPERATOR.
Clerk accepting
custody of meter enters initials on all three copies.
Block 8:
SUPERVISOR.
Meter custodian enters
initials on all three copies.
After the required information has been entered on
PS Form 3602-PO, the meter custodian will issue the
operating lever locking key, the triplicate copy of PS
Form 3602-PO, and release the meter to the meter
operator.
OPERATING THE POSTAGE METER
Now that you have the meter head in your
possession, you have to engage it to the meter base.
But before you can start producing meter tapes, make
sure that
the power plug is securely inserted into a
grounded electrical outlet,
the operating lever is positioned all the way to
the rear (OPERATE position),
the setting levers are positioned all the way up
(indicator window should show 00.00 amount),
and
the date has been set correctly and dater cover is
closed.
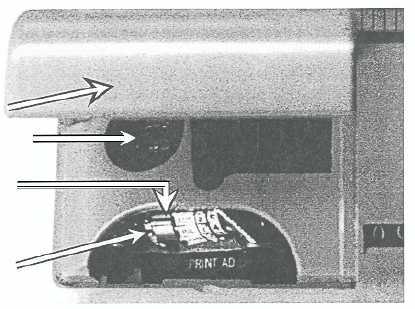
To change the date, raise the dater cover and move
the plastic wheels so that the proper date is in line with
the date index (metal ridge). The day and month can be
changed by turning the proper plastic setting wheels;
the plastic wheel at the left of the date index turns the
day units wheel at the right, and the 10th, 20th, and
30th of the month is set by moving the notched wheel
located at the right of the month wheel. The year can be
changed by turning the individual metal printing
wheels (see figure 8-11).
After changing the date, run a “zero” tape by
depressing the tape trip lever and verify if the date is
correct. Also check the ink tone on the tape. If the
imprint is light or uneven, add ink to the ink roller. DO
NOT over ink the roller or smudged impressions may
occur.
Now that the meter is ready, follow the steps given
below to produce meter tapes.
Set the amount by sliding the SETTING
LEVERS up or down to the correct amount.
Verify that the INDICATOR WINDOW displays
the selected amount (see figure 8-12).
For amounts $.99 or less, depress the TAPE
TRIP LEVER (see figure 8-13). For amounts
$1.00 and up, first press and hold down the
HIGH DENOMINATION BUTTON, then
depress the TAPE TRIP LEVER (see figure
8-14).
8-20
DATER COVER
POSTMARK DIE
DATE INDEX
(METAL RIDGE)
DAY UNITS PLASTIC
SETTING WHEEL
PCf0811
Figure 8-11.—An example of a postage meter print mechanism.
|