| |
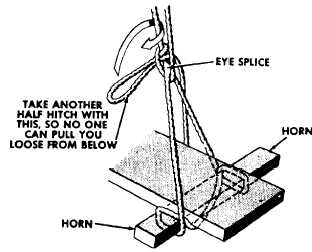
gantline (fig. 4-32). Be sure to pass the part between the
half hitches under the plank. If you pass it over, there
will be nothing holding you up but the horns. The
second method of rigging the stage is by the stage hitch
shown in figure 4-33. This method is the better of the
two because there are two parts of the gantline under the
plank instead of one, and there is no need to eye splice
the end.
REEVING GANTLINES
The best way to reeve your gantline for lowering is
over a smooth surface. Never have your gantlines
running over a sharp edge. Place chafing gear wherever
the lines from your shackles cross anything sharp.
The following safety precautions should be
observed while crew members are working over the
side:
1. Lower one end of your partner's stage at a time
while your partner keeps the other side secured.
2. Warn your partner before making moves that
may jar the stage.
3. Always wear a safety harness and lifeline with
dyna-brake when working on a stage.
4. Always wear a life jacket when working over
water.
5. Keep clear of overboard discharges.
6. Do not secure safety lines or gantlines to the
stations that hold up the lifelines; secure the line to a bitt
or cleat.
7. Do not allow more than two persons on a stage
at the same time.
8. Secure tools to the stage with small stuff to
prevent them from dropping.
Figure 4-32.–Eye splice rig on a stage.
TAKING SOUNDINGS
Soundings (measuring the depth of water) are taken
when the ship is going into or out of port or approaching
an anchorage. The hand lead is the most accurate means
for obtaining soundings. It is used in shallow water and
when the speed of the ship is slow. Even though ships
today have modem depth-sounding equipment, lead-
lines are a mandatory piece of equipment and are
routinely inspected during inspections and refresher
training periods.
LEAD LINE
The leadline or hand lead consists of a narrow block
of lead weighing from 7 to 14 pounds, which is attached
to a marked line (fig. 4-34). With the ship making 12
knots, a good leadsman can get reliable soundings down
to 7 fathoms. At slower speeds, of course, the lead has
time to sink even deeper before the ship moves up to it.
The leadline may also be used for determining the
direction in which a ship, practically dead in the water,
is moving. Direction of movement is found by placing
the lead on the bottom, directly below the leadsman, and
noting the direction of the motion of the ship as shown
by the change of direction of the leadline from the up
and down.
Before heaving, the leadsman takes station in the
chains, which usually are platforms projecting over each
side at the after end of the forecastle. The lead is then
lowered over the side and is supported in the heaving
hand by a wooden toggle, inserted in the lead line about
2 fathoms from the lead. The spare line is coiled in the
other hand, free for running.
To make the heave, start by calling out “WATCH-
ON-WATCH” then swing the lead in a fore-and-aft
direction outboard of the chains to gain momentum.
Then swing the lead in a complete circle. When the force
is great enough, let go the lead as it swings for- ward at
a point about level with the deck.
As the ship moves ahead, heave in the spare line
rapidly. The marker should be read when the lead is on
the bottom and the line hauled just taut, up and down.
The ability to heave the lead can be acquired only by
practice. It is necessary to practice with both hands
because the right hand is used for heaving from the
starboard chain; the left hand for heaving from the port
chain.
A good heave has no value unless the depth can be
read correctly and quickly. Learn the markings of the
leadline identified in figure 4-34.
Leadlines often are marked at each half fathom over
the range of depth used most and may even have foot
markings around the more important depths. Some
4-40
|

