| |
Figure 3-5.–Partially flemished line.
80.23
(fig. 3-5). Right-laid line is laid down clockwise;
left-laid line, counterclockwise.
SECURING ENDS
LEARNING OBJECTIVE: Explain the
procedures for securing ends of lines. Identify
the difference between a temporary whipping
and a permanent whipping of a line.
Never leave the end of a line dangling loose without
a whipping to prevent it from unlaying. The end of line
will begin to unlay of its own accord. To prevent
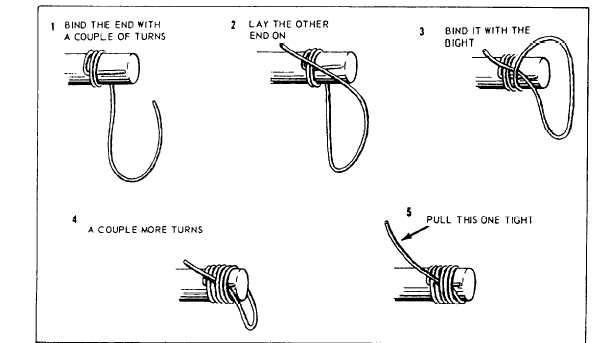
fraying, you should put a temporary plain whipping on
with anything, even a rope yarn, as shown in figure 3-6.
Lay the end of the whipping along the line and bind it
down with a couple of turns. Then lay the other end on
the opposite way, bind it with a couple of turns from the
bight of the whipping, and pull your end tight.
A permanent whipping is put on with a palm and
needle (see the section on Seaman's Tools in this
chapter). Thread a needle with sail twine, double it
(figure 3-7 shows single twine for clearness only), and
shove it through the middle of a strand so it comes out
between two strands on the other side. Bind the end
down with six or eight turns wound on from inboard
toward the end, and again shove the needle through the
middle of a strand near the end so it comes out between
two strands again. Then go up and down between
strands so as to place a cross-seizing between each pair,
as in figure 3-7.
Pull each cross-seizing taut before taking the next
one, and have the needle come out through the middle
of a strand on the last shove through, so the strand will
hold the end after you cut the sail. Remember, you must
wind the turns of whipping from the line toward the end;
otherwise, the needle will come out at the wrong side of
the whipping after you make the final cross-seizing.
When you cut a line, it is best to put on the whipping
before cutting the line. Ends of small stuff can be laid
up with a palm and needle whipping.
Several pieces of ropework start from a crown knot,
so now is the best time for you to learn to tie a crown.
Figure 3-8 diagrams the steps in making one. After you
haul down the crown taut by heaving on each of the
Figure 3-6.–Plain whipping a line.
3-8
|


